Flask SQLAlchemy Tutorial

Flask SQLAlchemy is a dynamic database toolkit tailored for Flask. It offers an intuitive interface for database operations within Flask apps, capitalizing on the capabilities of SQLAlchemy, a renowned object-relational mapping (ORM) library in Python.
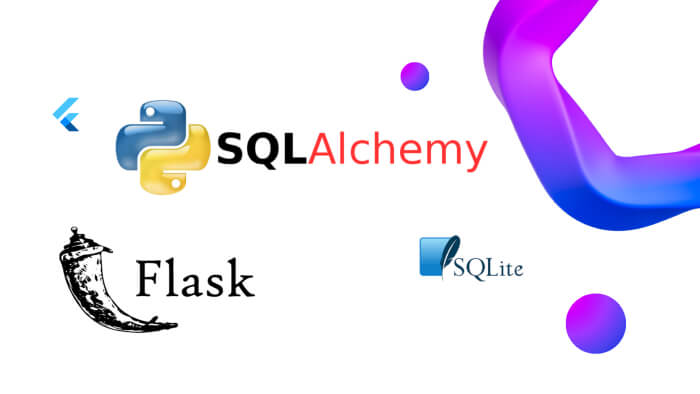
Object Relational Mapping (ORM)
Object-relational mapping, commonly known as ORM, is a programming technique that seamlessly connects the dots between databases and object-oriented programming languages. Imagine a scenario where you have a table in a database, and instead of writing lengthy SQL queries to interact with it, you could treat that table just like an object in your code. That’s precisely what ORM allows you to do.
For instance, consider you have a table named ‘Books’ in your database. In traditional database interactions, if you wanted to retrieve all books written by a particular author, you’d write an SQL query like:

With ORM, this interaction becomes more intuitive and aligns with object-oriented principles. You’d have a ‘Book’ class in your code, and fetching the same data would look something like:

Flask SQLAlchemy is a popular ORM tool tailored for Flask applications. It not only simplifies database interactions but also provides a robust platform to define data structures (models), execute queries, and manage database updates (migrations). One of its standout features is its compatibility with various databases, including SQLite, MySQL, and PostgreSQL.
To put it in perspective, setting up a model for our ‘Books’ table in Flask SQLAlchemy would look something like:

With this setup, adding, querying, or updating records becomes a straightforward task, closely mirroring how you’d interact with regular Python objects.
Let’s embark on a journey to delve deeper into Flask SQLAlchemy, illustrating its capabilities with easy-to-follow examples.
Setting up the development environment

Before diving into the creation of our Flask application, it’s crucial to ensure that our development environment is ready. Here’s a step-by-step guide to set things up:
Install Flask SQLAlchemy:
Flask SQLAlchemy is an essential extension that provides Flask applications with enhanced support for SQLAlchemy. It simplifies database operations and integrates seamlessly with Flask. To install it on your system, execute the following command:

Choose and Install a Database Management System (DBMS):
For this guide, we’ll use SQLite, a lightweight, file-based database system. It’s ideal for development and small-scale applications. Install SQLite with the command:

Create Your Database:
Once SQLite is installed, you can initiate a new database. The command below will create a database named ‘mydb’. Remember, the ‘.db’ extension indicates it is an SQLite database file.

Note: The name ‘mydb’ is just an example. You’re free to name your database as per your preference. The resulting ‘mydb.db’ file will reside in your current working directory and be accessed by SQLite for all database operations.
Verify Your Database Creation:
To ensure that the database has been created successfully, you can use SQLite’s built-in commands. Launch the SQLite shell and input the ‘.databases’ command:

This will display a list of all databases; you should see ‘mydb’ among them.
With the development environment fully configured, you’re now set to embark on the journey of crafting your Flask application.
[blog-subscribe]
Building the Flask Application
Setting Up the Flask Instance:
To kickstart our Flask journey, the first step is to instantiate a Flask application. Begin by crafting a new Python file, which we’ll name app.py for this example. Within this file, you’ll need to import the Flask class from the Flask module:

Here’s a breakdown of what’s happening:
- We’re importing the Flask framework, which provides the tools to build web applications.
- The Flask(__name__) call creates a new Flask web server from the Flask module. The __name__ argument tells the app where it’s located. This is crucial because Flask needs this information to retrieve resources like templates and static files.
Defining a Basic Route:
Routes determine how an application responds to a client request to a specific endpoint, typically a URI (or path). For our basic app, we’ll set up a root route that responds with a simple message:

Here’s the breakdown:
- The @app.route(‘/’) decorator tells Flask to execute the helloworld() function whenever a user accesses the root path (‘/’) of our application.
- The helloworld() function then returns the string ‘Hello, World!’, which will be displayed in the user’s browser.
Launching the Flask Application:
With the basic setup complete, it’s time to bring our Flask app to life. To do this, we’ll use a conditional statement to run the app:

Here’s what’s happening:
- The if __name__ == ‘__main__’: condition ensures the app only runs when this script is executed directly, not if it’s imported elsewhere.
- The app.run() method starts the Flask development server.
When you execute the app.py file, you should see a message indicating the server’s activity:

This message confirms that your Flask app is live and listening for incoming connections on port 5000. To witness your app in action, open a web browser and navigate to http://127.0.0.1:5000/. You’ll be greeted with the cheerful ‘Hello, World!’ message, signifying your successful entry into the world of Flask development.

Setting Up a Database with Flask-SQLAlchemy
Initial Configuration:
Before we dive into creating our database, it’s essential to set up the necessary configurations. Start by importing the required modules:

These lines bring in the Flask framework and the SQLAlchemy extension for Flask.
Flask App and Database Initialization:
Next, initialize your Flask app and set up the database configurations:

Here’s a breakdown:
- We’re initializing a Flask application instance.
- The SQLALCHEMY_DATABASE_URI configuration is set to point to our SQLite database. The prefix sqlite:/// indicates we’re using SQLite, while mydb.db is the name of the database file.
- We then create an instance of the SQLAlchemy class, linking it to our Flask app. This instance, stored in the db variable, will be our gateway to the database.
Defining Data Models:
With the initial setup complete, the next step is to define the structure of our database, often referred to as ‘models’. In SQLAlchemy, models are represented as Python classes:
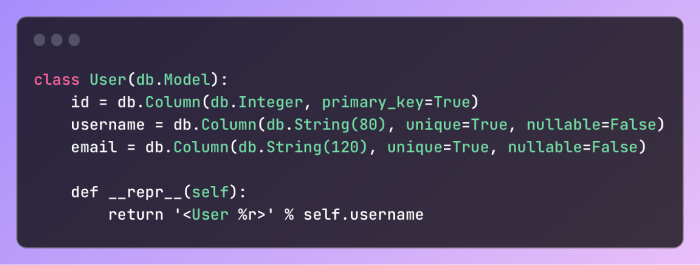
Let’s dissect this:
- We’re defining a User class that inherits from db.Model, making it a representation of a table in our database.
- Within the class, we define columns (or fields) for the table: id, username, and email.
- The id column is set as the primary key, ensuring each user has a unique identifier.
- Both username and email columns have constraints set: they must be unique, and values cannot be null (i.e., every user must have a username and email).
- The __repr__ method provides a human-readable representation of our object, useful for debugging and logging.
With these steps, you’ve successfully set up a basic database structure using Flask and SQLAlchemy. As you progress, you can expand on this foundation by adding more models, relationships, and advanced configurations.
Database Migrations with Flask-Migrate
Understanding Migrations:
Once the initial database setup is complete, it’s often necessary to make changes to its structure. These changes, known as migrations, can include adding new tables, modifying existing ones, or even deleting some. Migrations allow us to evolve our database schema over time without losing data. Flask offers a handy extension, Flask-Migrate, to manage these migrations seamlessly.
Installing Flask-Migrate:
Before we can use Flask-Migrate, we need to install it. This can be done using the pip package manager:

This command fetches and installs the Flask-Migrate extension, making it available for our project.
Initializing Migrations:
With Flask-Migrate installed, the next step is to set up migrations for our project:

This command initializes migrations by creating a new migrations directory in our project. This directory will house all our migration scripts.
Creating a Migration:
When there’s a change in our database schema, like adding a new column, we need to create a migration:

Here’s what happens:
- The migrate command checks for changes in the database schema.
- It then generates a new migration script inside the migrations/versions directory. This script will have a unique filename, which includes a timestamp, ensuring the migrations are applied in the order they were created.
- The -m flag allows us to add a descriptive message to our migration, which can be useful for documentation.
Understanding the Migration Script:
Each migration script contains two primary functions:
- upgrade(): This function contains the logic to transition from the old schema to the new one.
- downgrade(): In contrast, this function provides a way to revert the changes made by the upgrade() function, essentially acting as an “undo” button for migrations.
Applying Migrations:
After creating a migration, it’s time to apply it to our database:

This command goes through all the migration scripts in the migrations/versions directory that haven’t been applied yet and runs their upgrade() functions. As a result, our database schema gets updated to reflect the latest changes.
In summary, Flask-Migrate offers a structured and systematic way to manage changes to our database schema, ensuring that our application can evolve without data loss or manual schema adjustments.
Building and Managing User Data Routes with Flask
Introduction to Routes:
In Flask, routes determine how URLs are mapped to functions. These functions generate the content users see when visiting a specific URL. For our application, we’ll be creating routes to manage user data.
Setting Up the Basic Route:
Let’s start by creating a route to display all users:
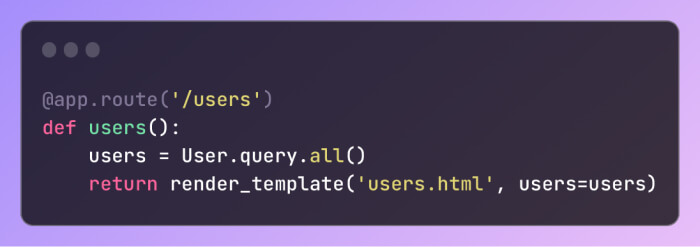
Here’s a breakdown:
- User.query.all() fetches all user entries from the database.
- render_template then takes these users and passes them to the users.html template. This template should reside in a folder named templates, as Flask looks here by default.
Understanding the Scenario:
Let’s dive into a hands-on example where we’ll develop a Flask application that allows users to CREATE, READ, UPDATE, and DELETE (CRUD) details of a student, specifically their first name, last name, and subject.
Setting Up the Database:
Assuming our development environment is ready, we’ll begin by creating our database named ‘studentList.db’. This is done using a Python script named databaseSetup.py.
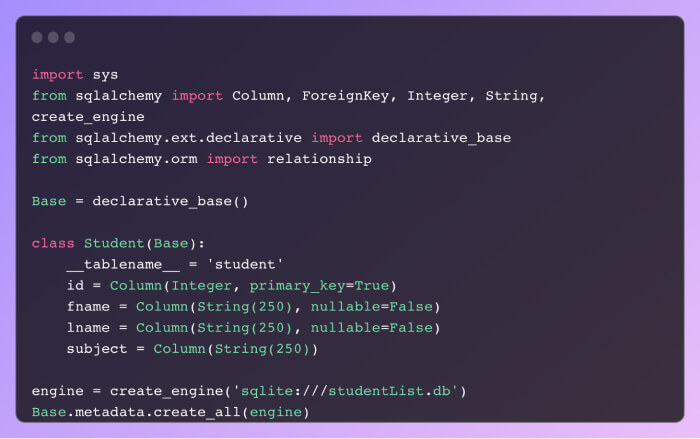
Here’s a breakdown:
- We start by importing the necessary modules from SQLAlchemy.
- declarative_base() is used to create a base class for our model.
- We then define the Student class, representing the “student” table in our database.
- Finally, we connect to our SQLite database and create the table.
Populating the Database:
An empty database isn’t very useful. So, we’ll populate it using another script named populateDatabase.py.
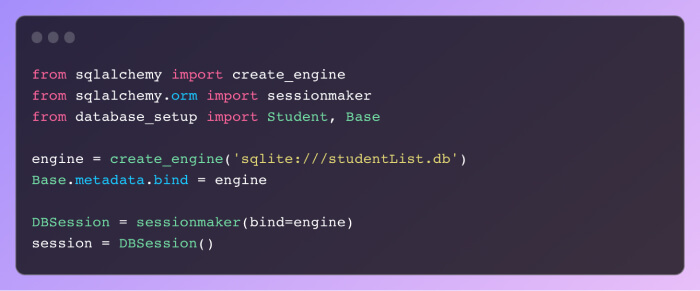
Here, we:
- Establish a connection to our database.
- Bind our model to this engine.
- Create a session to interact with the database.
Building the Flask Application:
Now, we’ll construct our Flask application to manage student data.
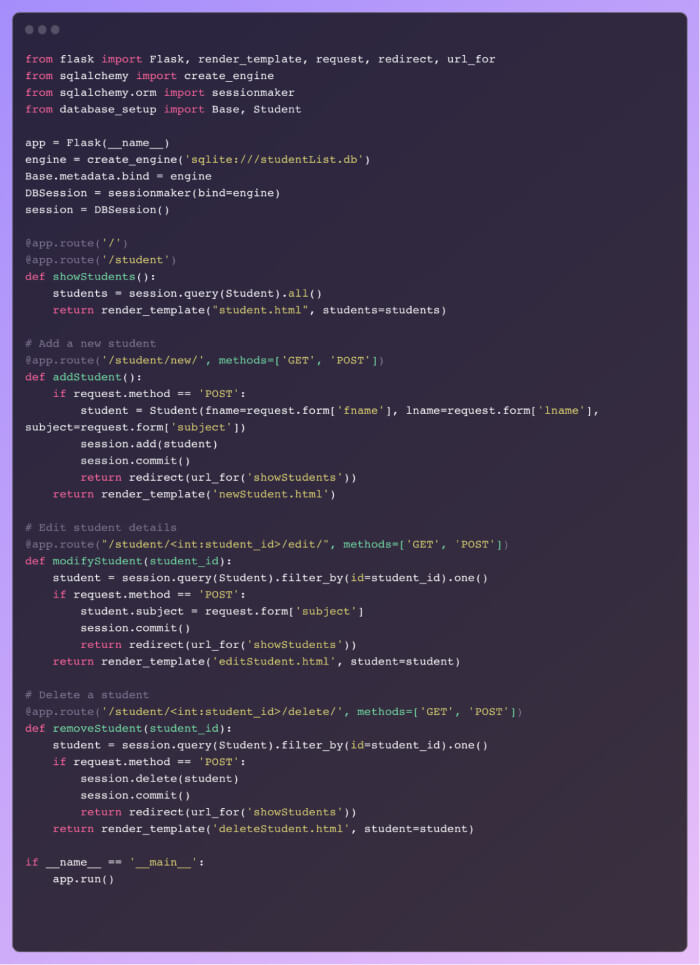
This script does the following:
- Sets up the Flask application and connects to the database.
- Defines routes to display, add, modify, and remove students.
Creating HTML Templates:
For our application to display content, we need HTML templates. Here’s a brief overview:
- student.html: Lists all students and provides options to edit or delete.
- newStudent.html: Contains a form to add a new student.
- editStudent.html: Allows editing a student’s details.
- deleteStudent.html: Confirms before deleting a student.
Running the Application:
Execute the Flask script, and you’ll see output indicating where the server is running, typically on http://127.0.0.1:4996. Accessing this URL in a browser will display our application.

In summary, we’ve developed a comprehensive Flask application for managing student data, complete with CRUD operations and user-friendly interfaces.
Final Thoughts
Flask combined with SQLAlchemy offers a potent blend for web developers aiming to seamlessly integrate relational databases into their applications. Throughout our journey, we’ve delved into the intricacies of setting up a conducive development environment, architecting a Flask application, and leveraging SQLAlchemy for efficient database management. Our hands-on example, where we manipulated student data, served as a testament to the capabilities and flexibility this combination provides. In essence, Flask and SQLAlchemy form a dynamic duo, streamlining the database-driven web application development process.

