12 CLI Tools That Are Redefining Developer Workflows
TL;DR
- AI coding assistant like Qodo Command, Amazon Q CLI, Gemini CLI, Codex CLI, Grok CLI, and Ollama help with PR reviews, code generation, and automation.
- Cloud & deployment CLIs (AWS CLI, gcloud CLI, Pulstack) enable provisioning, configuration, and production deployments without web consoles.
- Developer productivity tools (GitHub CLI, Lazygit, FFmpeg) streamline repo management, staging, diffing, and media processing.
- Emphasis on production workflows, these tools are wired into processes that directly ship and operate live systems.
- Modern workflows show CLIs becoming smarter and more context-aware, reducing context switching for developers.
Introduction: The CLI Just Got Smarter
Most of my daily development still runs through the terminal, running tests, grepping logs, reviewing PR diffs, deploying to staging, pulling down database snapshots, and killing rogue processes. For these tasks, the terminal is the quickest and most reliable way to get things done, no waiting for an overloaded web UI to render, no clicking through nested menus.
A few years ago, the CLI was basically the same toolbox it had been for decades: grep, awk, sed, ssh, maybe a few language-specific tools like npm or pip. Now, the CLI is evolving into a more automated, context-aware environment, where commands can chain together seamlessly, pull in data from multiple sources, and even run as part of intelligent workflows that execute without manual step-by-step intervention.
Now? I can sit in the same terminal session and have an AI assistant review a pull request, generate API docs, or spin up an entire Kubernetes cluster in GCP, no context switching, no browser tabs. I can run cloud deployments without touching the AWS console, query metrics directly from Prometheus, or generate ffmpeg commands without memorizing the flags.
The shift in workflow isn’t about adding a few new commands; it’s about the CLI becoming a programmable, context-aware interface that can handle the full scope of a developer’s workflow. That means AI tools that can read your repository and refactor, test, or explain code right where you’re working; cloud CLIs that can provision, configure, and deploy infrastructure without touching a web console; and productivity utilities that make git operations, media processing, and scripting not just faster, but less prone to human error.
There’s a solid r/programming thread called “Essential CLI Tools for Developers” (reddit.com) that’s worth reading. My list overlaps in spirit, but I’m focusing on the 12 tools that are actually changing day-to-day work in 2025.
Top CLI Tools in 2025 for Real Engineering Workflows
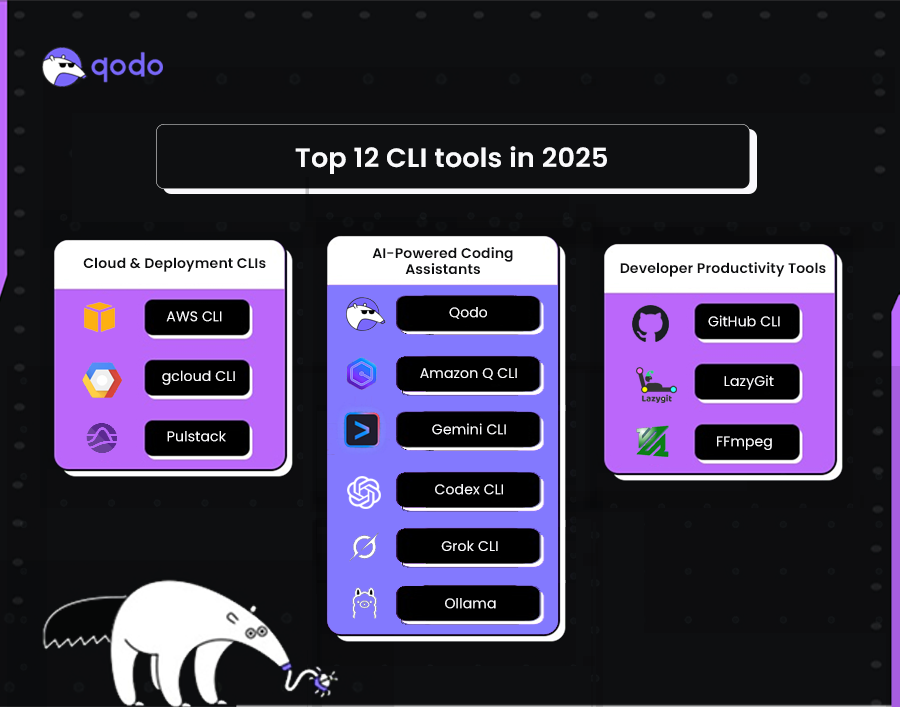
This list covers 12 CLI tools that are actively embedded in real engineering workflows, not just mentioned in blog roundups or used in isolated experiments. By “production workflows,” I mean tools that appear in CI/CD pipelines, deployment scripts, and operational automation that directly affect live systems, as well as in day-to-day developer routines that lead to production changes.
AI-Powered Coding Assistant CLI Tools
Cloud and Deployment CLI Tools
Developer Productivity CLI Tools
These CLI tools represent some of the most actively used technologies in real engineering workflows today. From AI-powered coding assistants to cloud deployment tools and developer productivity utilities, each plays a distinct role in modern software development.
If you’re looking for a quick, side-by-side comparison of their key capabilities and best use cases, check out the Top CLI Tools Comparison Table
Now, let’s pick each tool individually and do a detailed comparison to understand where they fit best in modern development workflows.
Best 12 CLI Tools in 2025
1. Qodo Command
Qodo Command is a CLI for running and managing AI agents that automate complex engineering workflows, interact with AI models, and integrate with external tools directly from the terminal. It is designed to support scalable developer productivity by converting natural language instructions into repeatable, configurable actions through agents defined in .toml configuration files, ensuring consistent behavior across environments and teams.
Built on Qodo’s core agent framework, Qodo Command provides Agentic AI capabilities for the software development lifecycle (SDLC). Agents can be configured to assist across different stages of development, including code generation, reviews, testing, debugging, CI/CD orchestration, and deployment, while adapting to organizational workflows, coding standards, and compliance requirements.
Qodo Command integrates with existing tools, systems, and environments to work within established engineering ecosystems. Agents can run where they are needed, in the IDE, terminal, CI/CD pipelines, or deployment scripts, ensuring flexibility across individual and team-based workflows.
Common use cases include code review on pull requests, automated test generation, debugging and troubleshooting, intelligent code generation, CI/CD workflow automation, and exposing agents as HTTP services. By defining workflows and integrations declaratively, Qodo Command enables teams to achieve consistent, reproducible results across projects, making it applicable to both individual developers and enterprise engineering environments.
Key Features:
- qodo chat – start an interactive chat in your terminal with the selected agent.
- qodo <command> – run a custom workflow you’ve defined for that agent.
- –ui – launch a browser-based chat UI tied to the same agent.
- –webhook – serve the agent as an HTTP endpoint so other tools can call it.
- –model – pick which AI model to use (Claude, GPT-4, etc.).
- –mcp – turn the agent into an MCP server to securely call other tools.
Example commands:
Review a PR:
qodo review --pr=123
Generate tests for a module:
qodo test --path=src/
Run in CI with no manual input:
qodo review --pr=123 --ci
First Hand Example:
On running qodo –ui in the working directory, Qodo first looks for an agent configuration file (agent.toml, agent.yaml, or agent.yml) and a qodo.md context file. When none are found, it warns you and falls back to defaults as shown in the terminal snapshot below:’
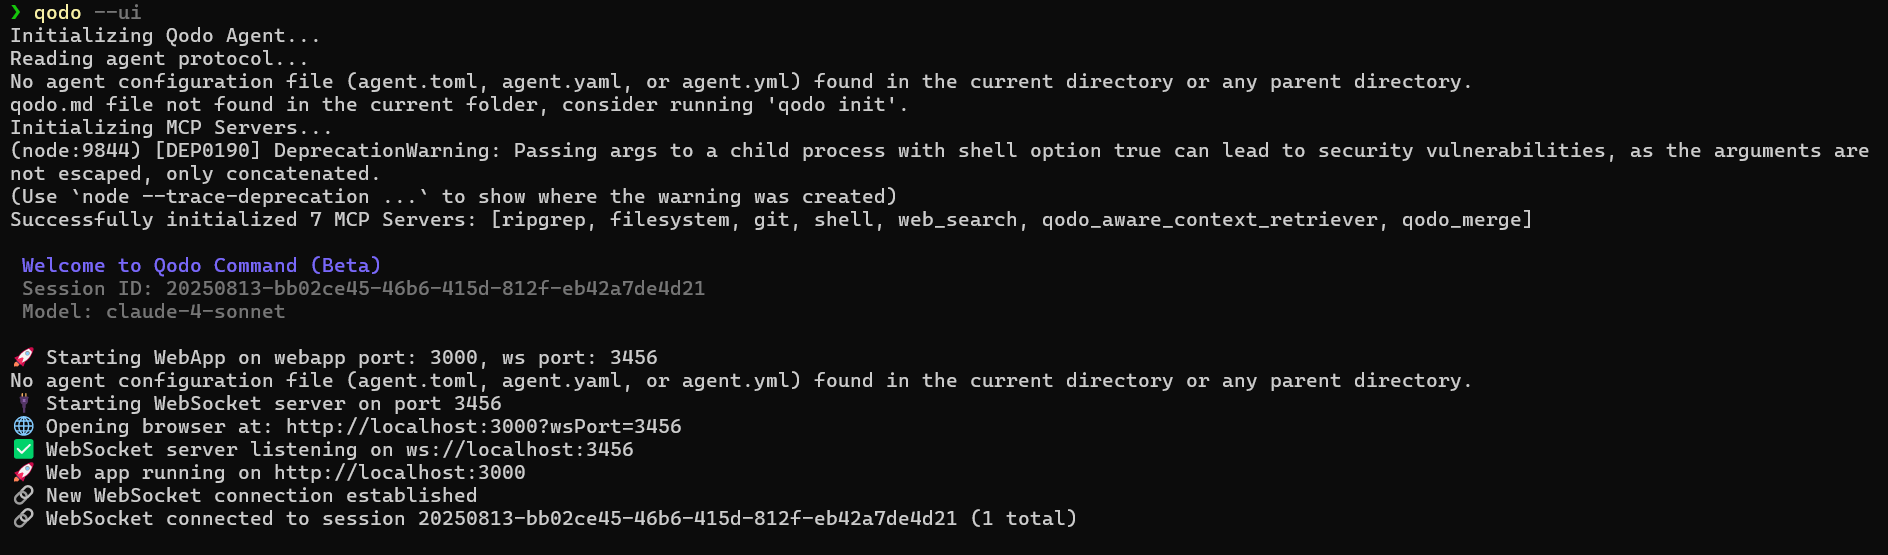
It then starts its Model Context Protocol (MCP) servers, here, ripgrep for fast text search, filesystem for file access, git for repo commands, shell for running local commands, web_search for online lookups, qodo_aware_context_retriever for pulling project context, and qodo_merge for combining outputs. With these running, it launches a local web app on http://localhost:3000 and a WebSocket server, opening your browser to connect the UI to the backend session (linked to the Claude-4-Sonnet model).
Once in the UI, entering “Review my latest changes” triggers the review workflow.
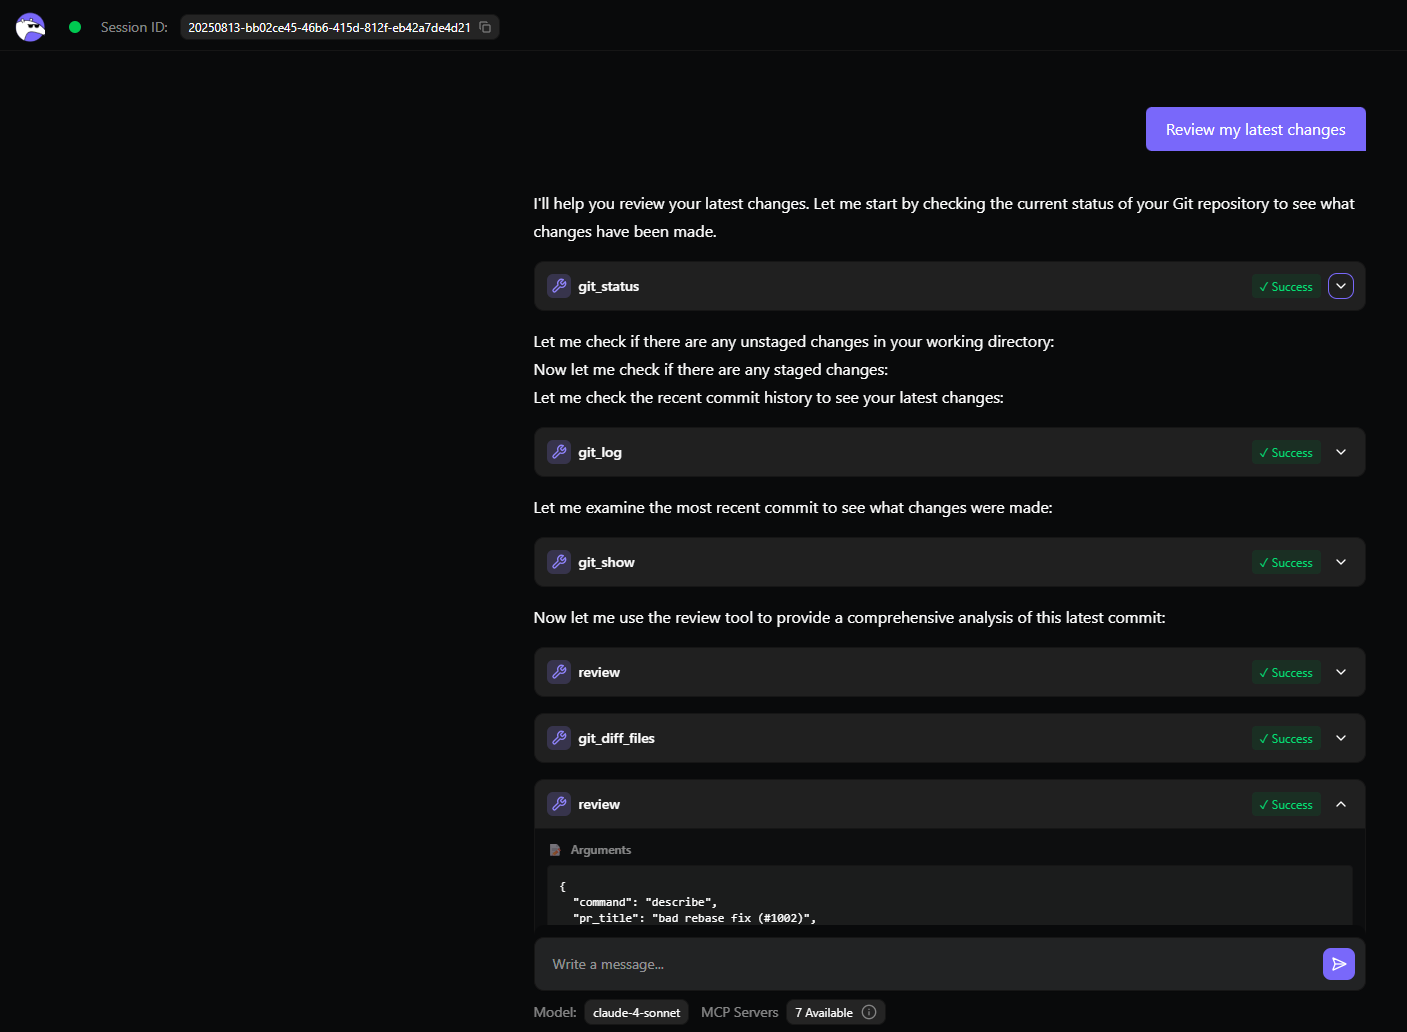
Qodo runs git status to check the working directory, git log to inspect recent commits, git show to view the latest commit, and git diff to extract file changes. It finds that pybind11 was updated from version v2.13.6 to master, and a duplicate PYBIND11_SRCDIR variable was removed. The AI produces a structured review: positives include cleaner code and a focused commit, while risks highlight instability and reproducibility issues from using master. Recommendations include pinning to a stable release, considering a newer tested version, and documenting the reason for the change. The UI then displays this analysis along with a diagram and file-level walkthrough, making it immediately actionable.
Pros:
- Fully configurable, reproducible AI workflows.
- Integrates into CI/CD, local dev, or HTTP endpoints.
- Can securely call other CLIs and APIs without leaking keys.
- Model-agnostic, works with Claude, GPT-4, etc.
Cons:
- Requires setup of .toml agents for best results.
- More technical overhead than “plug-and-play” AI CLIs.
Pricing:
- Developer: Free, 250 credits/month. Includes Qodo Merge (open source/75 PRs), CLI, IDE integration, repo indexing, automated tests, reviews, and docs.
- Teams: $30/user/month, 2,500 credits. Adds bug detection, automated PR descriptions, compliance checks, private support, and optional SSO.
- Enterprise: Speak to Qodo. Full platform, dashboard, analytics, multi-repo awareness, enterprise MCP tools, priority support, SaaS/on-prem/air-gapped deployment, self-hosted models.
2. Amazon Q CLI
Amazon Q CLI is AWS’s AI assistant for the terminal. It gives you autocomplete, inline suggestions, and a built-in chat so you can work faster without leaving your shell. It’s installed separately from the standard aws-cli and runs as its own process.
When you start typing a command, Q CLI shows a dropdown of completions for tools like aws, git, npm, and docker. For example, typing aws s3 will immediately suggest subcommands like ls or cp along with their flags. It also shows “ghost text” inline suggestions, which you can accept with Tab or →.
You can drop into a conversational mode with:
q chat
Here, you can ask for tasks in plain language, for example:
"List all S3 buckets modified in the last 24 hours"
Q CLI will generate the exact AWS CLI command, explain it, and optionally run it. For translating plain English to shell commands directly, use:
q translate "find all Python files modified in the last week"
For longer or multi-step prompts, the /editor command opens your default text editor. You can write the instructions there, save, and Q CLI will run them when you close the editor.
First Hand Example:
In this Amazon Q CLI hands-on, the request was to build a complete NGINX-style reverse proxy in Go with path-based routing, static file serving, load balancing, gzip compression, caching headers, and TLS termination.
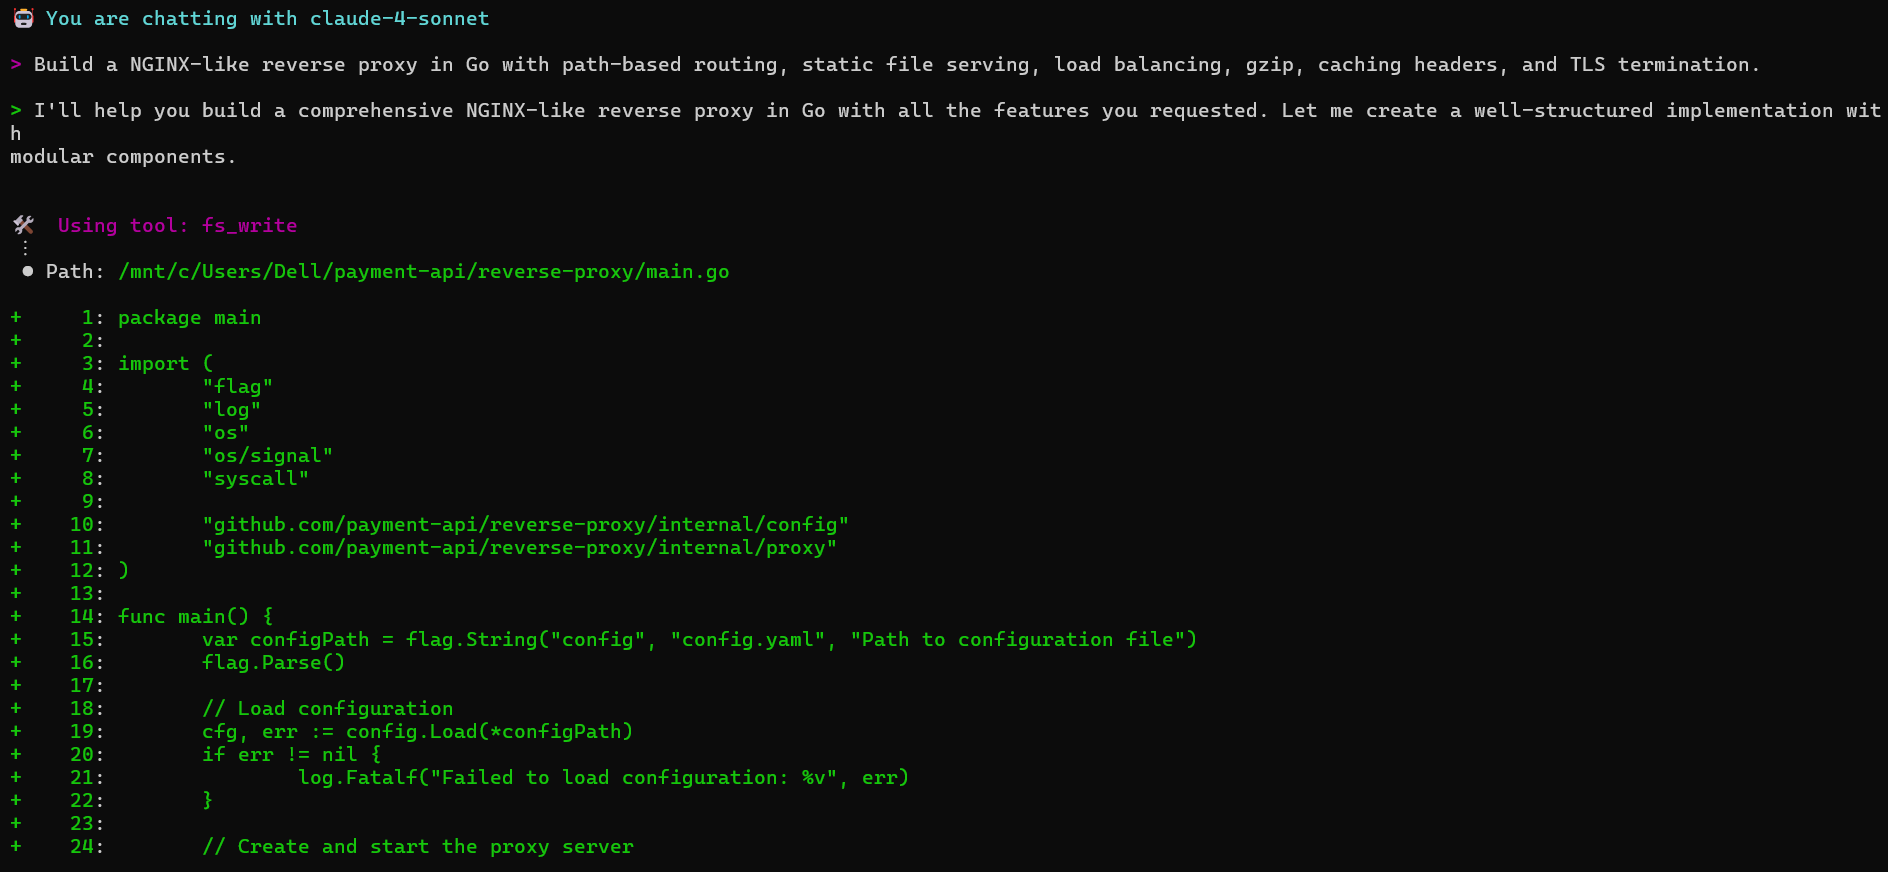
As shown in the above snapshot, Q generated a full project structure with separate internal packages, configuration, middleware, and deployment tooling. The main.go entrypoint handles config parsing, server startup, and graceful shutdown. The internal/config package loads and validates a YAML config file that supports server settings, routing, TLS, gzip, and caching options.
The internal/proxy package implements the HTTP server, path-based router, reverse proxy logic, and backend health checks. Load balancing is handled in internal/loadbalancer with round-robin, least-connection, and IP hash algorithms, plus weighted backends and automatic failover. Middleware covers logging, panic recovery, CORS, gzip compression, cache control, and security headers.
Static file serving is built with MIME detection, cache headers, and directory traversal protection. Gzip is configurable by content type and size thresholds. TLS termination supports custom certificates and configurable security settings.
Q also created development tooling, a Makefile with build targets, a Dockerfile, docker-compose setup, and example backend services, along with static web assets, documentation, architecture diagrams, and usage guidelines. The final layout is a clean, modular Go project that can be built and run locally or deployed in containers.
Pros:
- Speeds up AWS operations by removing the need to remember exact syntax.
- Works with multiple common CLIs, not just AWS.
- Conversational mode can chain together multi-step commands.
Cons:
- AWS-only for cloud tasks, no multi-cloud support.
- Requires installation and setup separate from aws-cli.
- You still need the correct IAM permissions for the commands it runs.
Pricing
- Business plans: Lite is $3/user/month with basic conversational access; Pro is $20/user/month, adding full Amazon Q Apps, QuickSight Reader Pro, image responses, and enterprise plugins. Index capacity is metered separately for document intelligence
- Developer plans: A perpetual Free tier includes basic code suggestions and CLI/IDE integrations; the Pro tier is $19/user/month, offering higher agentic request limits, identity-center support, customization, and IP indemnity.
3. Gemini CLI
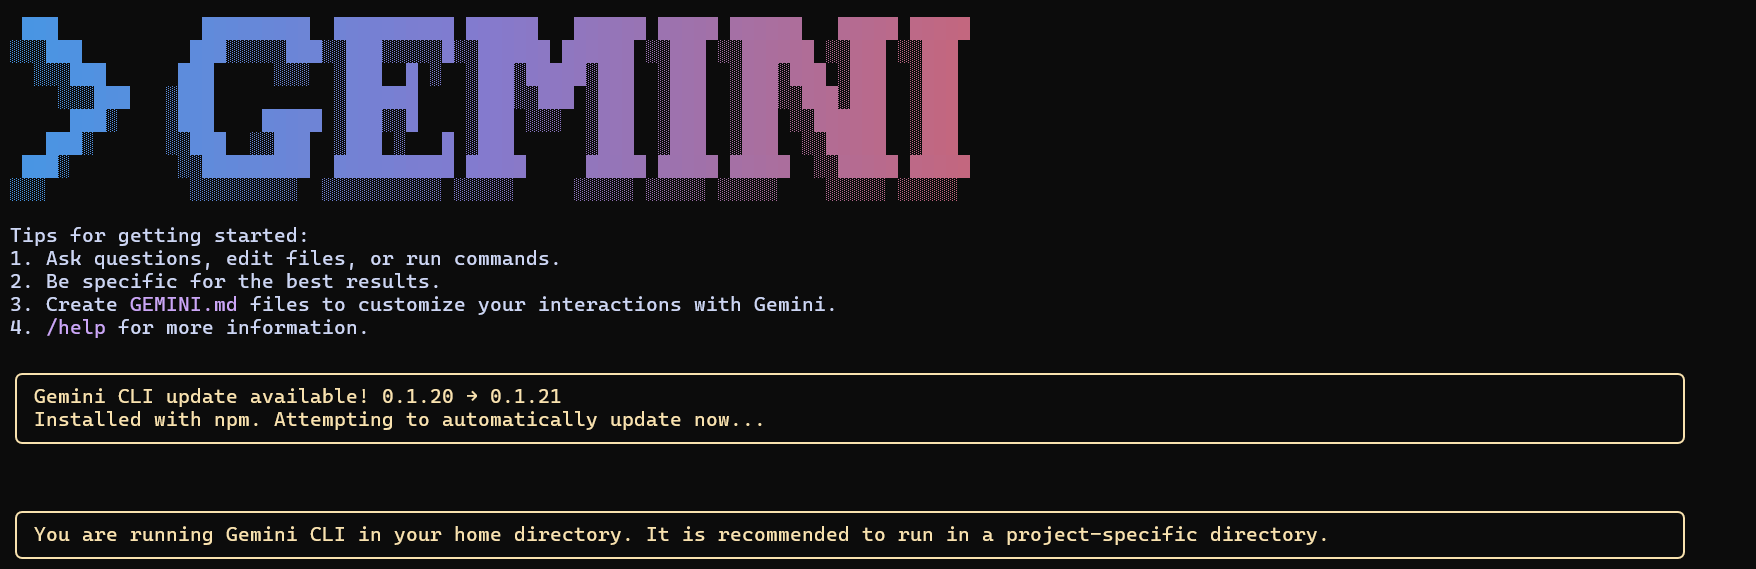
Gemini CLI is Google Cloud’s native conversational interface for the terminal. It’s built on the same Gemini models used in Google’s AI tooling, but integrated tightly with gcloud so it can read your project context, interact with resources, and generate commands without you needing to look up exact syntax.
Key features
- Conversational AI built into the CLI, describe a task in plain language, and get back the correct gcloud commands.
- Environment awareness uses your current GCP project, region, and authentication context.
- Error troubleshooting, can parse error output and suggest fixes, including missing permissions or misconfigured APIs.
- Deployment assistance helps write and run gcloud commands for Compute Engine, Cloud Run, GKE, and more.
- Script generation can output multi-step deployment or provisioning scripts.
Example commands
gemini chat
> "Create a GKE cluster named dev-cluster with 3 nodes in us-central1"
Gemini CLI will generate:
gcloud container clusters create dev-cluster \
  --num-nodes=3 \
  --region=us-central1
gemini chat
> "Fix IAM error when deploying Cloud Run service"
It will check the error details, identify the missing role, and suggest:
gcloud projects add-iam-policy-binding <PROJECT_ID> \
  --member="serviceAccount:<SERVICE_ACCOUNT>" \
  --role="roles/run.admin"
First Hand Example:
In this example, the goal was to enhance the transactions endpoint by enforcing input validation and setting up centralized error handling. The process started with the AI reading the existing src/index.js file to understand the current setup, as shown in the snapshot below:
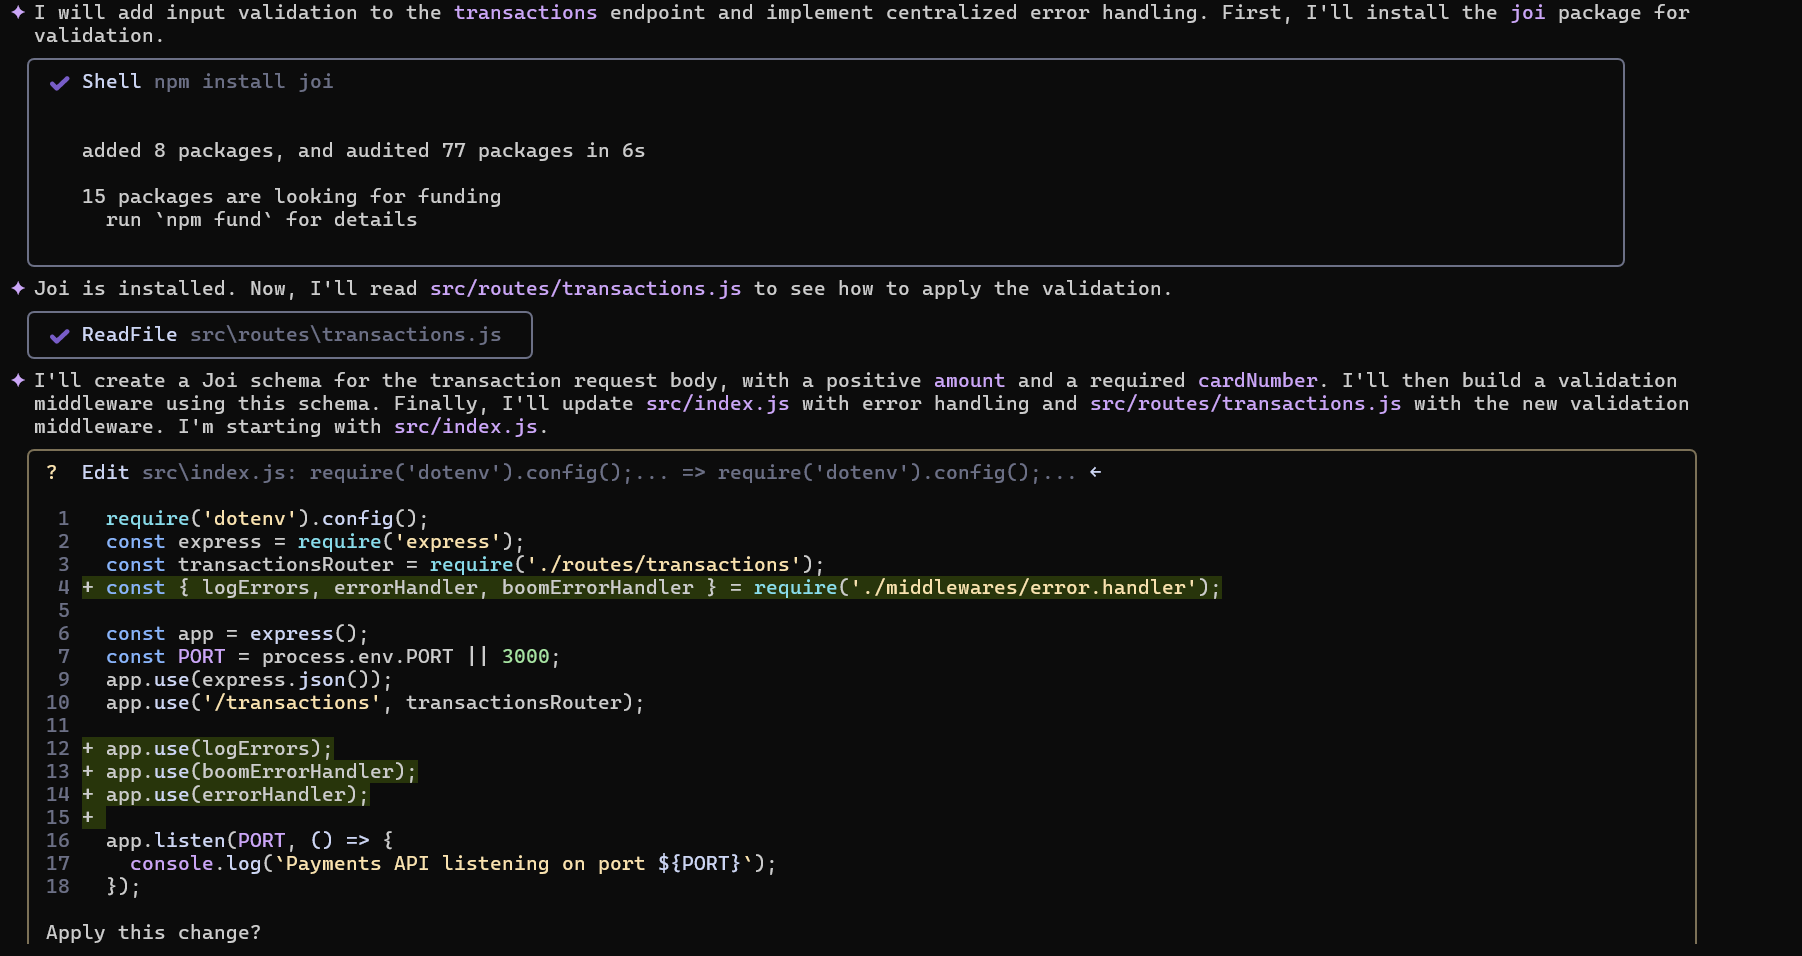
The first step was to install Joi, a powerful schema description and validation library for JavaScript:
npm install joi
Once Joi was installed, the AI inspected src/routes/transactions.js to identify where the validation middleware would be integrated.
Next, a Joi schema was created for the request body, enforcing:
- amount: must be a positive number
- cardNumber: required string field
A middleware was built to validate incoming requests against this schema. If validation failed, a 400 Bad Request error would be returned.
Finally, src/index.js was updated to wire up the centralized error-handling pipeline:
- logErrors: logs error details for debugging
- boomErrorHandler: formats and standardizes error responses
- errorHandler: handles generic server errors gracefully
These middlewares were registered after all routes, ensuring they catch and handle errors from any endpoint.
Updated src/index.js snippet:
const { logErrors, errorHandler, boomErrorHandler } = require('./middlewares/error.handler');
app.use('/transactions', transactionsRouter);
app.use(logErrors);
app.use(boomErrorHandler);
app.use(errorHandler);
With this setup, any invalid payload sent to the transactions endpoint will be blocked before reaching the business logic, and all errors will flow through a consistent, centralized handler.
Pros
- No need to memorize long gcloud syntax.
- Uses your actual project state to generate relevant commands.
- Good for both provisioning and troubleshooting.
Cons
- Only works in GCP environments, no multi-cloud.
- Requires proper IAM permissions to execute suggestions.
- Some advanced workflows still require manual scripting.
Pricing
The free tier includes generous limits, up to 60 requests per minute and 1,000 per day, suitable for most developer tasks, with easy onboarding via Google AI Studio.
4. Codex CLI
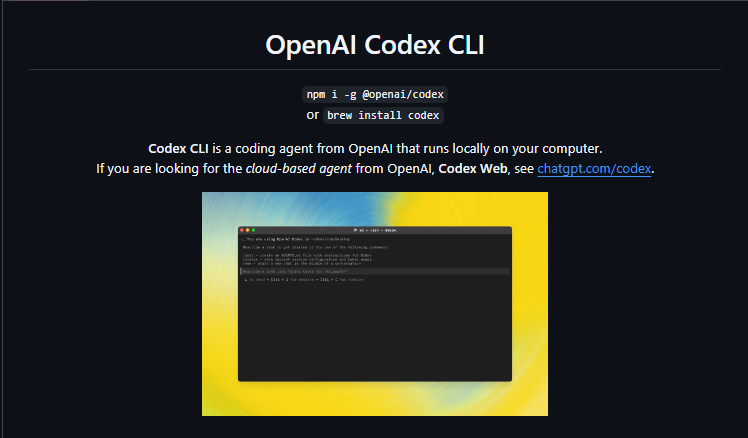
Codex CLI is OpenAI’s terminal-based coding agent for running Codex-1 and Codex-mini versions of the o3/o4-mini models fine-tuned for software engineering. It integrates with your local repositories but executes tasks in a secure, cloud-based sandbox that mirrors your dev environment.
Install with:
npm install -g @openai/codex
Requires Node.js 22+ and an OpenAI account (Plus, Pro, Enterprise, or Team; Edu coming soon). Logging in via codex login now automatically sets up your API key.
Key Features
- Cloud sandbox execution: Runs code edits, tests, and commands in an isolated environment preloaded with your repo.
- Parallel task handling: Multiple independent tasks can run simultaneously.
- Approval modes: Choose between suggest (review first), auto-edit (apply edits), or full-auto (edit + run commands without asking).
- Repo-aware editing: Reads project structure and follows AGENTS.md guidelines for style, testing, and navigation.
- Traceable changes: All edits include terminal logs, test results, and citations for verification.
- Simple login: Sign in with your ChatGPT account; no manual API key generation.
- Fast model: Uses codex-mini-latest for quick, low-latency editing and Q&A.
First Hand Example:
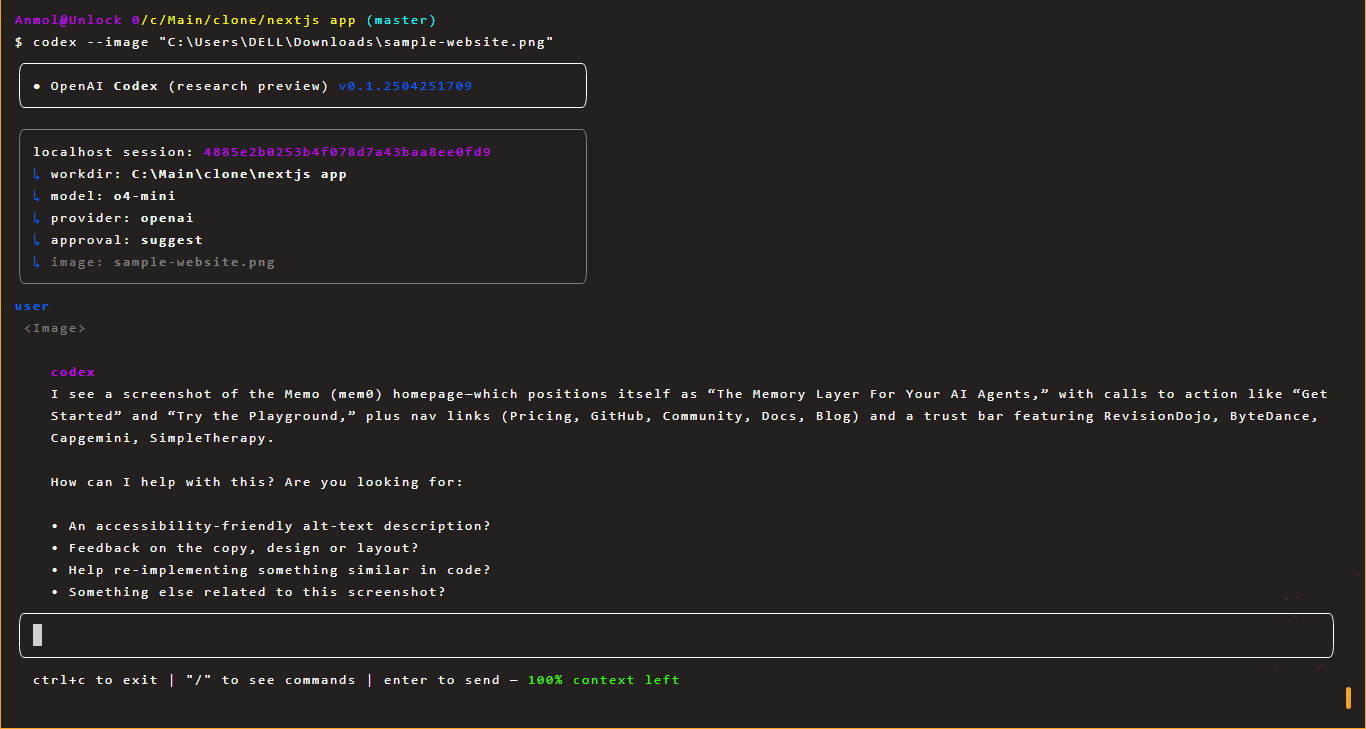
In this example, Codex CLI is being run with an image file to get contextual code assistance based on a visual reference. The command:
codex –image “C:\Users\DELL\Downloads\sample-website.png”
starts a Codex research preview session (v0.1.2504251709) using the o4-mini model. The CLI connects to a local working directory (C:\Main\clone\nextjs app) and uses the suggest approval mode, meaning Codex will propose changes before applying them.
Codex processes the provided sample-website.png and automatically generates a description as shown below in the snapshot:
From here, Codex proactively offers options:
- Generate accessibility-friendly alt text.
- Provide feedback on copy, design, or layout.
- Help re-implement the same UI in code.
- Suggest related development actions.
This workflow shows how Codex CLI can understand assets beyond code files, making it useful for frontend work, design audits, or converting mockups into code without leaving the terminal.
Pros
- Strong security from isolated cloud execution.
- Can handle complex, multi-step coding tasks automatically.
- Easy integration with GitHub repos and existing workflows.
- No setup headaches, login handles API keys.
- Multiple approval levels give you control over automation.
Cons
- Requires internet; no offline mode.
- Cloud execution results in higher latency compared to local editing.
- Currently lacks image input support for frontend tasks.
- No mid-task intervention means you can’t course-correct once a task starts.
Pricing
For users without a ChatGPT Plus subscription, usage is billed via OpenAI’s API at standard token rates, with total cost depending on task complexity and token volume. Typical code-change requests on models like o3 may run about $3–$4, and OpenAI has occasionally provided API credits for qualifying open-source Codex CLI projects.
5. Grok CLI
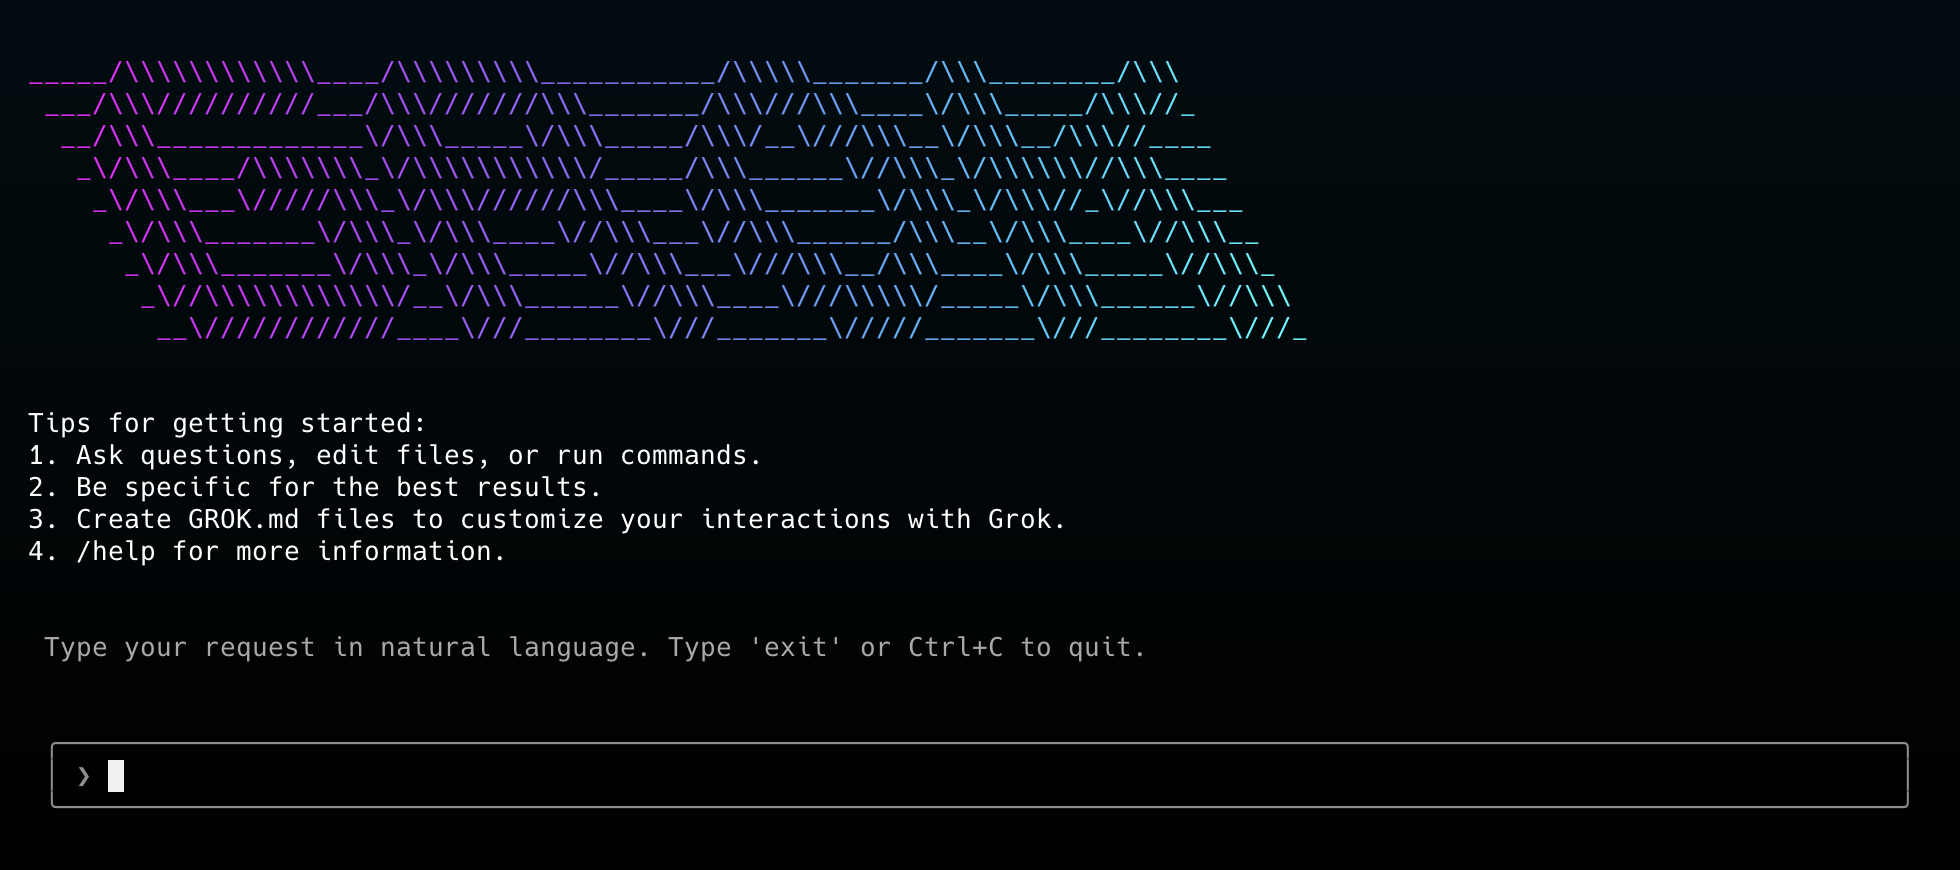
Grok CLI is an open-source terminal interface built by xAI that brings the Grok large language model directly into your shell. Unlike most cloud-only AI assistants, it supports local inference, meaning you can run it entirely offline, and has direct access to your file system and shell. This makes it useful for secure or air-gapped environments where privacy is critical.
Key Features:
- Local inference: Run Grok’s LLM on your own machine without needing an internet connection.
- Shell & file access: Inspect, explain, and manipulate files or run shell commands via natural language.
- Extensible plugin system: Build and install plugins to integrate with other CLI tools or custom workflows.
- Privacy-first design: Local data storage and strict user control over whether any data is shared for model training.
- Context-aware assistance: Reads project files to give code reviews, refactoring suggestions, or explanations that match your codebase.
- Real-time data from X: If connected online, it can fetch up-to-date info (e.g., news, finance, trends) via the X platform.
First Hand Example:
In this example, Grok CLI is running with the grok-4-latest model. You start by typing a natural language request in the terminal:

Grok interprets it, translating your request into the exact shell command it needs to run. Before execution, Grok displays the generated command (for example, ls -la) along with a note about any detected changes. It then prompts you for confirmation with multiple options: run it once, run it without asking again for the session, cancel, or cancel with feedback. Using the arrow keys, you navigate to your choice and press Enter. Once confirmed, Grok executes the command directly in your shell and shows the output inline, allowing you to continue working without switching contexts. This workflow combines the safety of explicit confirmation with the convenience of natural language command generation, making it ideal for both everyday tasks and more sensitive operations.
Pros
- Strong productivity boost by automating code generation, debugging, and repetitive tasks.
- Offline & privacy-friendly – No need to send data to external servers.
- Reads and understands your project context for better suggestions.
- Plugin architecture makes it adaptable to custom workflows.
- Can optionally pull real-time info from X to augment responses.
Cons
- Still new and evolving, so you may encounter bugs or incomplete docs.
- Smaller ecosystem compared to more established AI CLIs.
- Optional X integration means some features depend on an external platform.
- Like all LLMs, they can produce biased or inaccurate outputs if not verified.
- Local inference can be resource-intensive on older machines.
Pricing
Pricing is per million tokens, varying by model. Grok-4-0709 supports a 256k context window at 2M TPM and 480 RPM, billed at $3.00 (input) and $15.00 (output) per million tokens. Grok-3 offers 131k context, 600 RPM, at the same rates. Grok-3-mini keeps the 131k context but lowers costs to $0.30 (input) and $0.50 (output) per million tokens.
6. Ollama
Ollama is a command-line tool that lets you run large language models locally without touching the cloud. You download a model once and run it entirely on your machine—no API keys, no rate limits, no sending data anywhere. It works on macOS, Linux, and Windows, and supports models like Llama 3, Mistral, and Gemma.
Key Features
- Local model execution – Pull models like llama3, mistral, or gemma and run them directly on your CPU/GPU.
- Simple CLI commands – ollama pull to download, ollama run to chat, ollama list to see models, ollama ps to check running sessions.
- Image + text input – Some models can take an image file and answer questions about it (ollama run llava).
- REST API – Start ollama serve and make HTTP requests from your apps.
- Self-contained models – Model files include all weights/config so they’re portable.
First Hand Example:
To start using Ollama, first pull the model you want. For example, to download Mistral:
ollama pull mistral
Once it’s downloaded, you can run it locally:
ollama run mistral
This launches an interactive session where you can chat with the model. In the example below, the user asks “Who is Brandon Sanderson?” and Mistral responds with a detailed biography, all processed locally without sending data to any external server.
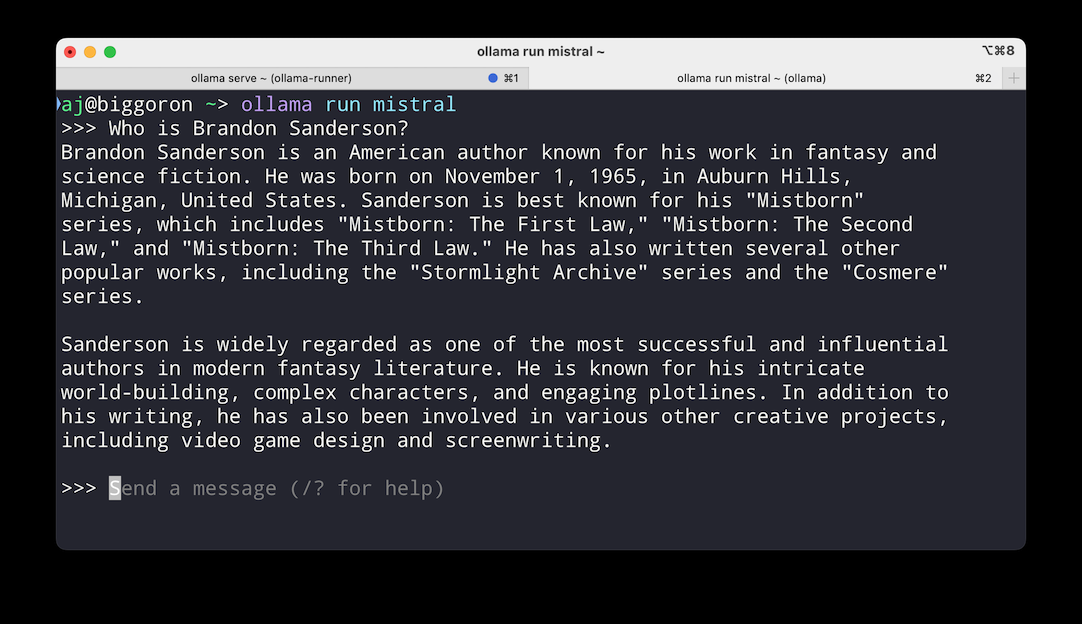
You can exit the session at any time with Ctrl+C. For repeated use, models stay cached locally so you don’t have to re-download them.
Pros
- Fully offline, private, no data leaves your machine.
- Runs multiple models side-by-side.
- Lightweight install, quick startup.
- Works the same way on macOS, Linux, and Windows.
Cons
- Needs plenty of RAM and a good CPU/GPU for bigger models.
- CLI-centric, no fancy UI unless you add your own.
- Smaller community and fewer integrations than cloud AI tools.
Pricing
Free and open-source model
7. AWS CLI
The AWS CLI is Amazon’s official command-line tool for managing all AWS services—S3, EC2, IAM, Lambda, CloudFormation, and everything else—directly from your terminal. It’s what you use when the AWS Console is too slow, when you want repeatable scripts, or when you’re automating deployments in CI/CD.
Key Features
- Full service coverage – Every AWS API is available. AWS CLI v2 comes bundled with its own Python runtime and adds consistent features like ISO-8601 timestamps, better binary handling, and regional endpoint defaults for STS and S3.
- Profiles & SSO – You can store multiple named profiles in ~/.aws/config. For enterprise setups, aws configure sso integrates with AWS IAM Identity Center to give you short-lived credentials without manual key rotation.
- Data filtering & formatting – Use –query with JMESPath to extract only the fields you need. Format output as json, table, or text for scripts or human-readable results.
- Pagination & waiters – Flags like –max-items and commands like aws ec2 wait instance-running let you handle large datasets and wait for resources without writing your own polling logic.
- Secure ECR login – Use aws ecr get-login-password piped to Docker for secure, password-stdin authentication—no more deprecated get-login command.
- Cross-platform install – Pre-built installers for macOS, Windows, and Linux; Snap package available for automatic updates.
First Hand Example:
To start using the AWS CLI for managing EC2 instances, first install AWS CLI and configure it with your credentials by running:
aws configure
This will prompt you to enter your AWS access key, secret key, default region, and preferred output format, saving them in your local AWS config files. You can verify the setup with aws sts get-caller-identity –profile dev-admin, which returns your account ID and IAM user information. Once configured, you can list all EC2 instances in your selected region along with their instance IDs, public IPs, and private IPs by running:
aws ec2 describe-instances \
  --query "Reservations[*].Instances[*].[InstanceId,PublicIpAddress,PrivateIpAddress]" \
  --output table \
  --profile dev-admin
Here, the –query flag uses JMESPath syntax to filter and return only the required fields, while –output table formats the output in a clear, human-readable table as shown in the terminal snapshot below:
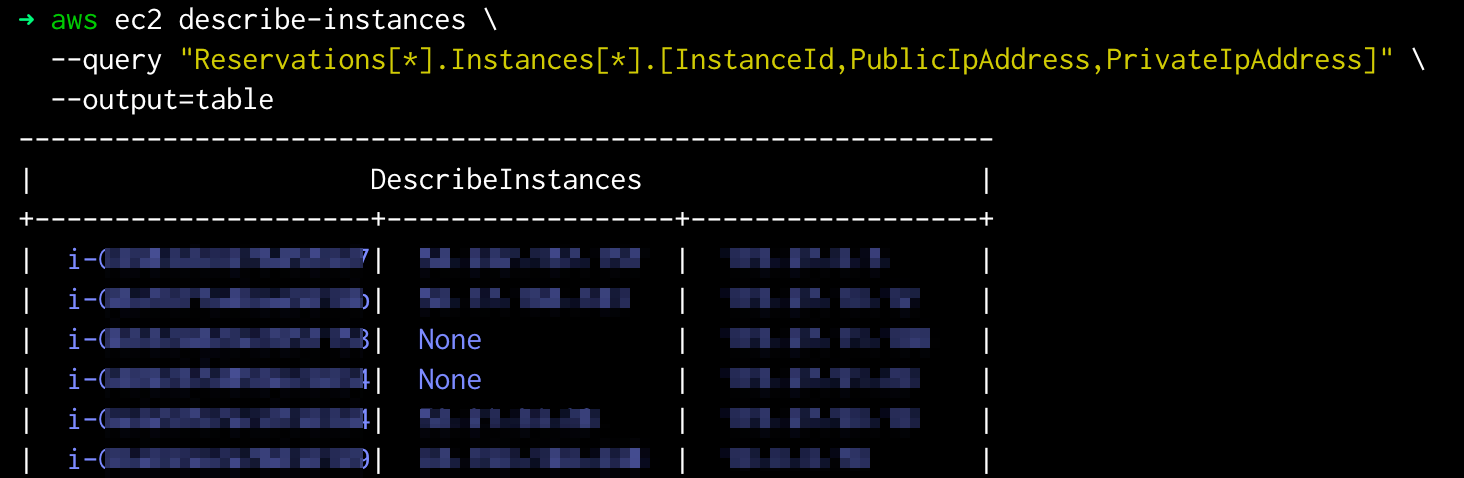
The result is a quick overview of all active EC2 instances in your account, making it easy to audit and manage your infrastructure.
Pros
- Works with every AWS service, no feature gaps.
- Flexible output for both humans and scripts.
- SSO support removes the need for long-lived keys.
Cons
- Commands can be long and verbose.
- Service-specific options may require checking the docs because the CLI mirrors raw API calls.
- Some defaults (like region handling) changed between versions; be aware when upgrading.
Pricing
The AWS CLI is free to install and use, with no direct charges for running commands. However, any AWS services accessed through the CLI are billed according to their standard service pricing (e.g., S3 storage, EC2 compute hours, CloudFront data transfer).
8. gcloud CLI
gcloud is Google Cloud’s official command-line tool for managing and automating various aspects of GCP, including projects, deployments, IAM, logging, storage, and more. It’s part of the Google Cloud SDK (which also bundles gsutil for storage and bq for BigQuery).
Key features
- Project and auth setup (gcloud init) – Logs you in, lets you pick your default project, and sets your preferred region/zone. You can keep multiple configs and switch between them.
- Cloud Run deployments – Deploy code or containers directly from your machine using gcloud run deploy. Supports options for memory, concurrency, and regions.
- IAM management – Create and manage service accounts, bind roles to users or groups, and inspect predefined/custom roles.
- Logging – Pull logs from services like Cloud Run, GCE, and GKE with filtering and different output formats.
- CI/CD ready – Works headless with service account authentication, making it easy to run in pipelines.
First Hand Example:
After authenticating gcloud with your Google Cloud account and setting your active project using:
gcloud auth login
gcloud config set project PROJECT_ID
You can work directly with Google Cloud Storage buckets from the CLI. For example, to list all buckets in your current project along with their Access Control List (ACL) details, run:
gcloud storage buckets list
As shown in the snapshot below, the list displays detailed metadata for each bucket in your project.
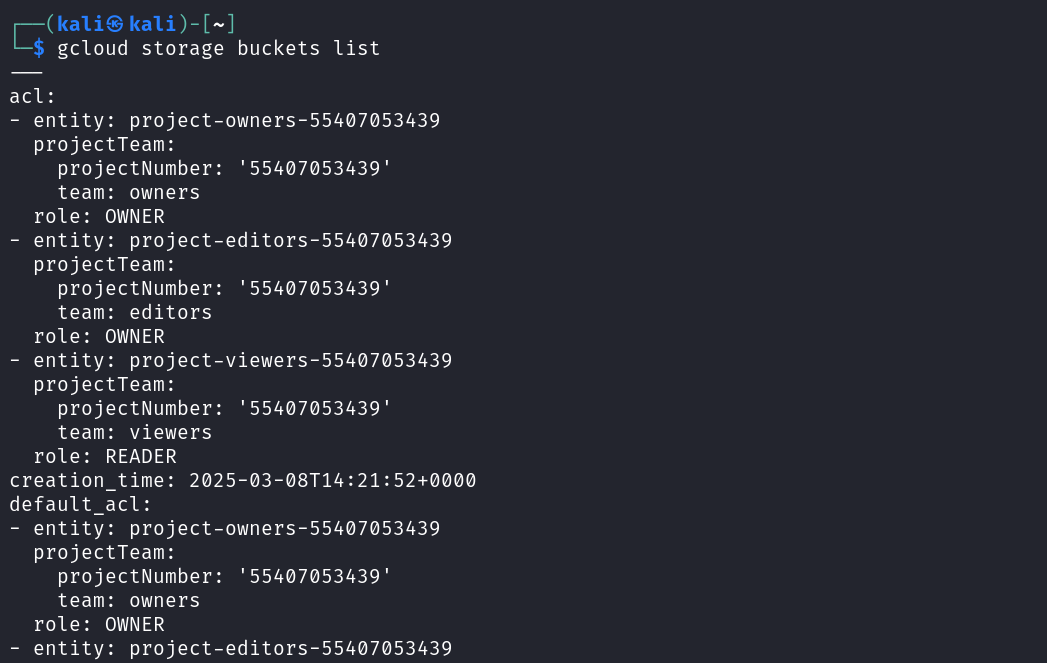
The output includes ACL entries that list which Google Cloud project roles—such as owners, editors, and viewers- have access. It also shows project team details, including the project number and the associated team type. Each entry specifies the assigned role, indicating whether a team has OWNER or READER access. Additionally, the output includes the bucket’s creation time, as well as the default ACL, which defines the permissions automatically applied to any new objects created within that bucket. This is useful in environments where you need to verify who has access to storage without navigating the Cloud Console.
Pros
- Supports a wide range of GCP services and operations.
- Ideal for automation and CI/CD integration.
- Predictable, consistent command syntax.
- Access to new features via Beta and Alpha channels.
- Fast and efficient for frequent tasks.
Cons
- Requires installation and initial configuration.
- Steeper learning curve for new users.
- Needs regular updates when used locally.
- Multiple release channels can cause complexity.
Pricing
The gcloud CLI is free to download and use, with no cost for running commands themselves. Any charges come from the underlying Google Cloud services you interact with (e.g., Compute Engine, Cloud Storage, BigQuery), billed according to their respective pricing models.
9. Pulstack
A CLI tool for deploying static sites to AWS S3 + CloudFront or GitHub Pages without writing any infra config. Uses Pulumi to provision and manage resources as code.
Key features:
- Deploys HTML/CSS/JS or builds outputs (React, Vite, Next.js, etc.) in one command.
- Automatically provisions S3 bucket, CloudFront CDN, or GitHub repo and Pages config.
- Secure AWS defaults (private buckets + CloudFront OAI).
- Interactive CLI prompts for project name, region, stack name, and target platform.
- Single-command stack destroy that removes all provisioned resources.
First Hand Example:
To get started with Pulstack, first install Node.js (node -v) and the Pulumi CLI from pulumi.com/docs/install, then log in using pulumi login. If you’re deploying to AWS, you’ll also need the AWS CLI (aws –version), along with an IAM user that has the following permissions:
s3:*, cloudfront:*, iam:GetUser, iam:PassRole,
iam:CreateServiceLinkedRole, logs:*, sts:GetCallerIdentity
Configure these credentials locally using aws configure. If you’re deploying to GitHub Pages instead, create a Personal Access Token (Classic) with repo and delete_repo permissions.
Once prerequisites are in place, initialize your project by running:
node index.js init
Pulstack will verify the CLI tools are installed, check your login status, and prompt you for project details such as name, description, stack name, and region as in the snapshot below:
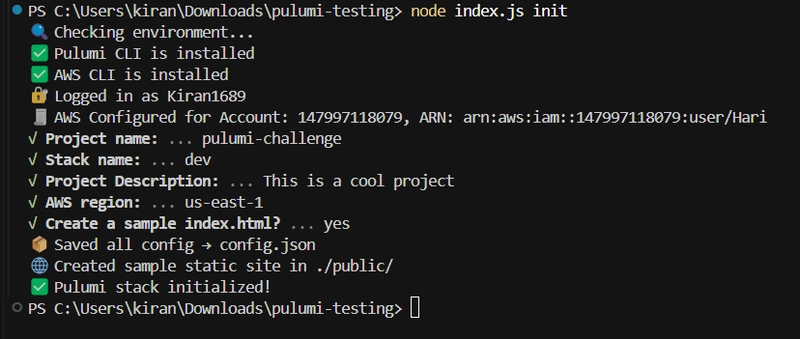
You’ll also have the option to generate a sample index.html in the ./public folder. These settings are saved in config.json, and a Pulumi stack is created automatically.
Below is an example of the init process in action:
After initialization, you can deploy your site. For AWS, run:
node index.js deploy --target aws --dir ./public
Pulstack provisions a secure S3 bucket, uploads your site files, sets up a CloudFront distribution with an Origin Access Identity (OAI), and returns a public CDN URL. For GitHub Pages, use:
node index.js deploy --target github-pages --dir ./dist
This creates a GitHub repository, pushes the site to the gh-pages branch, enables Pages, and returns the live URL.
When you no longer need the deployment, run:
node index.js destroy
This removes all Pulumi-managed resources for the stack, cleaning up your cloud environment in one command.
Pros:
- Fully automates S3, CloudFront, and GitHub Pages setup via Pulumi.
- Zero manual AWS/GitHub console work once credentials are configured.
- Enforces non-public S3 buckets by default.
- Works with any static build output folder.
- Built-in destroy command cleans up infra instantly.
Cons:
- Requires Pulumi account login before use.
- Needs AWS CLI configured with IAM user permissions or GitHub PAT.
- Only supports static site hosting (no server-side logic).
- Limited deployment targets compared to multi-platform tools like Vercel or Netlify.
Pricing
Free and open source
10. GitHub CLI (gh)
GitHub’s official command-line interface for managing issues, pull requests, repositories, and workflows without leaving the terminal. It streamlines common contributor and maintainer tasks, code reviews, issue triaging, and CI/CD triggers into fast, scriptable commands.
Key features:
- Create, view, list, and edit issues (gh issue create, gh issue list).
- Full pull request lifecycle: create, checkout, review, merge (gh pr create, gh pr checkout, gh pr review, gh pr merge).
- Manage GitHub Actions workflows (gh workflow list, gh workflow run).
- Clone, fork, and create repositories (gh repo clone, gh repo create).
- Custom aliases and scripting support for repeatable workflows.
First Hand Example:
After installing GitHub CLI and authenticating with gh auth login, you can handle an entire pull request review workflow from the terminal.
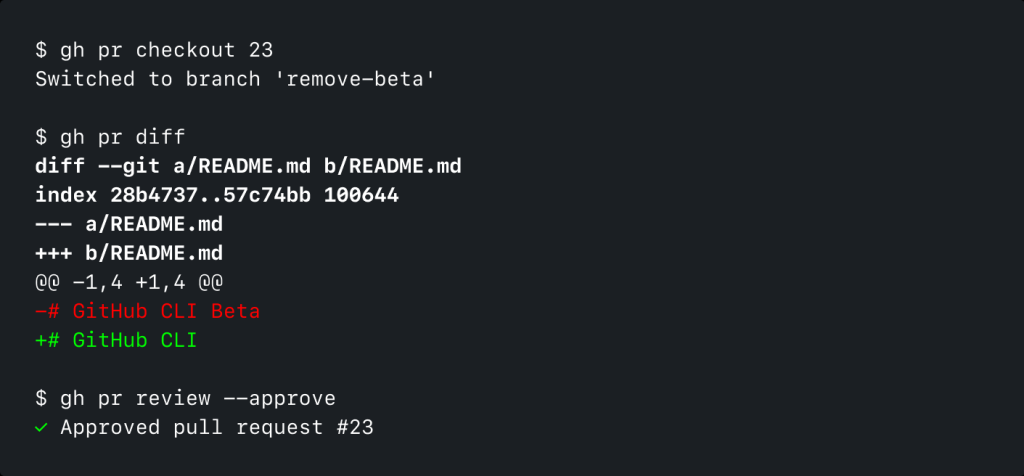
For example, in the above snapshot, to review PR #23, first check it out locally using
gh pr checkout 23
It pulls down the branch and switches to it. Then, view the proposed changes with gh pr diff to inspect file modifications directly in the terminal. Once satisfied, approve the PR by running gh pr review –approve, which submits the approval to GitHub without opening a browser. In this example, PR #23 modifies README.md to remove the word Beta from the title, and the reviewer approves it in one seamless terminal session.
Pros
- Eliminates the need to switch between the terminal and browser.
- Fully supports core GitHub workflows, including Actions management.
- Scriptable for automation and CI/CD integration.
- Consistent command structure with good autocompletion support.
Cons
- Requires authentication setup before use.
- The feature set is limited to what GitHub exposes via API (some UI-only features are not available).
- Command discovery can be challenging for new users without referencing the docs.
Pricing
Free to use and open source.
11. LazyGit
A fast, terminal-based UI for Git written in Go. It runs entirely in your terminal and lets you stage, commit, rebase, and manage branches using only the keyboard. For developers who prefer to stay in the terminal but want a clear, interactive view of Git state and history. Especially useful for fine-grained staging, history cleanup, and branch management.
Key features:
- Stage files, chunks, or individual lines with the spacebar.
- View and scroll through commit history with diffs.
- Interactive rebase: reorder, squash, drop, or edit commits without typing complex commands.
- Cherry-pick (Shift+C to copy, Shift+V to paste), bisect (b), and undo actions (z).
- Manage multiple branches and worktrees directly from the UI.
- Built-in commit graph view for quick history inspection.
Hands-on:
When you launch lazygit inside a repository, the screen is divided into panels for status, files, branches, commits, patches, and stashes. In the example below, the top-left Status panel shows the current branch (svc-dev → main) and repo state.
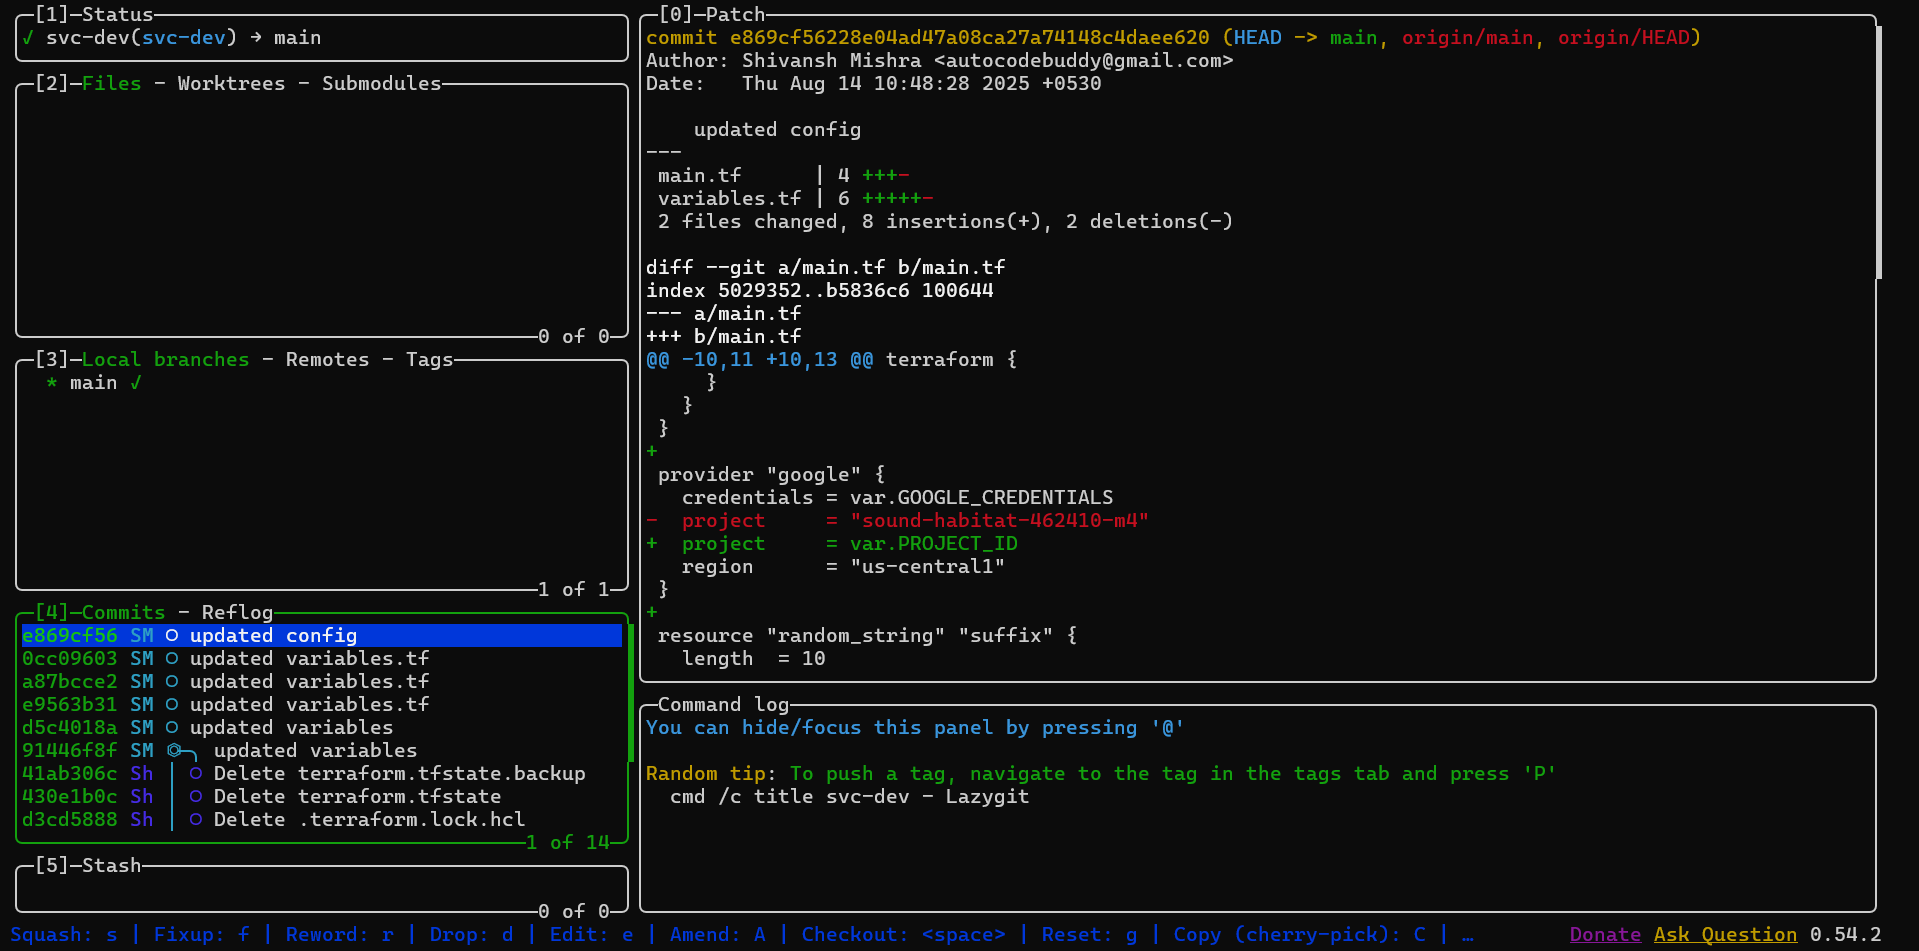
The Files panel lists modified files, which can be expanded to view hunks or individual lines for staging with the spacebar. The Local branches panel allows quick switching, creation, or deletion of branches. The Commits panel displays recent commits, with the currently selected commit (e869cf56 – “updated config”) showing its diff in the Patch panel. Red lines indicate removed code, while green lines are new additions.
Here, the project field in main.tf and variables.tf was updated from a hard-coded string to use var.PROJECT_ID. From this view, you can amend (A), cherry-pick (C), reset (g), reword (r), or drop (d) the commit without leaving the interface. The bottom command log provides context-aware tips, such as how to push tags or focus panels. This layout replaces multiple Git commands with a single, interactive, keyboard-driven workflow.
Pros:
- Fast keyboard-driven workflow.
- Easier staging and rebasing than raw Git commands.
- Clear visualization of repo state.
Cons:
- Still requires learning keybindings.
- Not a full replacement for all Git commands.
Pricing
Free to use and open source
12. FFmpeg
A powerful open-source multimedia framework and CLI tool for recording, converting, streaming, and processing audio/video. FFmpeg supports almost every codec and container format, making it the go-to choice for developers working with media pipelines or automation scripts. For developers and media specialists who need a scriptable and cross-platform tool with full control over audio and video processing.
Key features:
- Versatile multimedia handling: Decode, encode, transcode, mux, demux, stream, filter, and play virtually any audio/video format.
- Extensive codec and format support: Works with H.265/HEVC, VP9, AAC, Opus, and formats like MP4, MKV, FLV, MOV, AVI, and more.
- Granular control: Fine-tune parameters for compression, bitrate, codec selection, scaling, and filters.
- Diverse functionality: Format conversion, editing, filtering, effects, streaming, screen capture, and metadata editing.
- Automation-friendly: Ideal for batch jobs and CI/CD pipelines via scripting.
First Hand Examples:
One of FFmpeg’s most common uses is to inspect detailed metadata of an audio or video file without actually playing or processing it. This is especially useful for debugging encoding issues, verifying codec compatibility, or checking bitrate and resolution before transcoding.
To view metadata for a file (video.mp4) without displaying the FFmpeg banner information, run:
ffmpeg -i video.mp4 -hide_banner
What happens here:
- -i video.mp4: specifies the input file to analyze.
- -hide_banner: suppresses the build/configuration banner, showing only relevant file info.
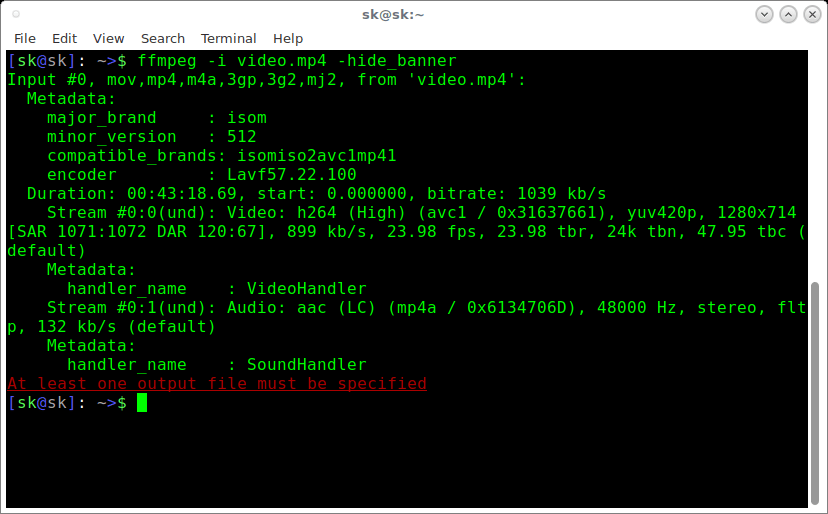
The output includes:
-
- Container format & codecs: Example, MP4 container, H.264 video, AAC audio.
- Resolution & framerate: Here, 1280×714, 23.98 fps.
-
- Bitrate: Combined ~1039 kb/s, split between audio and video streams.
- Audio details: AAC, stereo, 48 kHz sample rate, 132 kb/s bitrate.
- Duration: Full length of the file (e.g., 00:43:18.69).
The last line (At least one output file must be specified) is not an error in this context. FFmpeg is simply reminding you that without specifying an output file, it won’t process or transcode the input. Here, we’re only inspecting metadata, so the command is working as intended.
Pros:
- Handles decoding, encoding, transcoding, muxing, demuxing, streaming, filtering, and playback in one tool.
- Broad codec and format support (modern and legacy).
- Highly customizable processing with fine-grained CLI options.
- Supports automation and scripting for batch operations.
- Open-source, cross-platform, and hardware-acceleration capable.
- Large, active developer community and extensive resources.
Cons:
- Steep learning curve for new users.
- No native GUI (only CLI; third-party GUIs exist but may limit features).
- Batch processing requires scripting, which can be tedious for some.
- Occasional bugs or instability in certain builds.
- Documentation can be dense and challenging to navigate.
Pricing
Free to use and open source
Top CLI Tools Quick Comparison Table
| Tool | Key Capabilities |
| Qodo Command | Code review, test generation, CI/CD automation, enterprise SDLC integration |
| Amazon Q CLI | Command autocomplete, shell scripting, AWS DevOps integration |
| Gemini CLI | GCP provisioning, deployment automation, and error troubleshooting |
| Codex CLI | Code refactoring, test generation, multi-step automation |
| Grok CLI | Offline inference, file/context access, plugin extensibility |
| Ollama | Local model execution, multimodal inputs, private inference |
| AWS CLI | Service management, CI/CD integration, infrastructure automation |
| gcloud CLI | GCP deployments, IAM management, CI/CD workflows |
| Pulstack | Static site deploys, resource provisioning, automated teardown |
| GitHub CLI (gh) | PR management, repo workflows, Actions integration |
| Lazygit | Branch visualization, interactive staging, and rebase management |
| FFmpeg | Media conversion, compression, streaming automation |
Let’s see how enterprises are approaching the next stage of developer productivity, moving from individual CLI-driven efficiency to standardized, organization-wide workflows. As engineering teams scale, the focus shifts to creating consistent, reproducible processes that work seamlessly across local environments, CI/CD pipelines, and production systems.
Qodo in the Enterprise: Standardized AI Workflows at Scale
Following our deep dive into the CLI tools that accelerate individual developers, we now shift focus to the next frontier: how to turn those tools into organization-wide automation. Qodo Command extends beyond individual productivity by enabling centrally defined, reproducible AI workflows. Agents are configured in version-controlled .toml files, ensuring that the same logic runs consistently in a developer’s IDE terminal, in CI/CD with –ci, or as an HTTP endpoint using –webhook.
For enterprise environments, Qodo Aware applies retrieval-augmented generation over the organization’s codebase. This allows agents to perform context-rich operations, such as PR reviews or architectural compliance checks, with an understanding of cross-repository dependencies and historical implementation patterns.
Built-in agents can be integrated directly into source control automation:
- Qodo Merge performs pre-review analysis of pull requests.
- Diff-test generates test suites targeting newly introduced code paths.
- Coverage agents create tests to meet predefined thresholds before merge.
- Release notes agents compile changelogs from commit and PR metadata.
These agents run with the same configuration across local and pipeline environments, reducing variance between development and production automation, and enabling consistent enforcement of code quality and process standards.
Conclusion
Across the CLI tools covered, the focus has been on those already embedded in production workflows, from media processing with FFmpeg to infrastructure automation and AI-assisted development. Qodo extends this ecosystem by offering configurable, version-controlled agents that operate consistently across local, CI/CD, and service endpoints, making it suitable for standardized, repeatable workflows at scale.
FAQs
I’m looking for a good AI code assistant that offers CLI or IDE plugins for incident response runbooks and config-lint fixes. Do you have any suggestions?
Yes. Qodo stands out because it provides a CLI-first experience alongside IDE integrations. It supports automation for incident response runbooks and offers smart IaC and config-linting fixes directly from the command line. This makes it a strong fit for DevOps and SRE workflows.
Are there any AI code assistants that offer robust CLI support along with other capabilities for developers?
Yes. Most AI assistants are IDE-centric, but Qodo is designed with both CLI and IDE use cases in mind. Developers can script Qodo into CI/CD pipelines, use it for security/config fixes, or run it interactively in the terminal, making it versatile beyond just editor-based AI.
What is a CLI AI agent?
A CLI AI agent is an AI-powered tool you interact with via the command line. Instead of only working in a browser or IDE, it listens to commands and generates responses directly in the terminal. Qodo is a good example; it functions as a CLI AI agent for tasks like code fixes, runbook execution, and developer productivity workflows.
What is CLI Python?
CLI Python usually refers to writing command-line tools in Python. Many developers use Python’s argparse or click libraries to build CLIs. Qodo itself integrates well into Python-based projects since it can be scripted in Python environments and works seamlessly with virtualenvs and pip-based workflows.
How does Cursor CLI compare to Claude Code?
Cursor CLI is tied to the Cursor IDE, while Claude Code focuses on natural language code generation. Qodo offers a different take: it brings AI features directly to the terminal with CLI-first design, while still being usable inside IDEs. Developers who prefer terminal workflows often find Qodo more flexible than IDE-tied assistants.
What are the best AI CLI tools in 2025?
Some of the best AI-powered CLI tools in 2025 include:
- Qodo – AI code assistant with CLI + IDE plugins, great for incident response and IaC fixes.
- GitHub Copilot CLI – terminal-focused commands for code explanation and command generation.
- AWS CLI with Q integrations – AI-assisted AWS operations.
- Lazygit with AI extensions – interactive git management with AI hints.
What are CLI tools?
CLI (Command-Line Interface) tools are programs you operate by typing commands into a terminal or shell instead of using a graphical UI. They’re common in development, automation, and DevOps because they can be scripted, integrated into CI/CD, and run in remote or headless environments. Examples include git, ffmpeg, lazygit, qodo, and aws.
How do you make a good CLI tool?
Good CLI tools share certain traits:
- Consistent command structure and predictable flags
- Useful defaults with override options
- Clear help output and documentation (–help, man pages)
- Meaningful exit codes for automation
- Cross-platform compatibility
- Structured output formats like JSON/YAML for machine parsing
- Low startup latency and minimal dependencies
Is Git a CLI tool?
Yes. Git is a distributed version control system primarily accessed via its CLI. While GUIs exist, the CLI (git status, git commit, git rebase) exposes the full feature set.
What are the types of CLI?
Common categories include:
- Shells – Bash, Zsh, PowerShell.
- Single-purpose utilities – grep, curl, ffmpeg.
- Multi-command suites – git, kubectl, aws, qodo.
- Interactive CLIs – lazygit, qodo –ui for richer in-terminal workflows.